Linux Mint 19 Tara LTS
Fans of theLinux operating systemshave been in for a treat this year. AfterUbuntu 18.04 LTS Bionic Beaverwas released earlier this year, the next iteration of the LTS (Long Term Support) version of Linux mint operating system, Linux Mint 19 Tara released.
The user-friendly and lightweight distribution is one of the most popular ones around, and regular security updates and support is guaranteed. This is because of the LTS version and the fact that Linux Mint 19 is based on Ubuntu 18.04. We have already covered thenew set of featuresbeing introduced to the latest Mint Project. Go check the links to know more.

How To Install Linux Mint 19 Tara LTS?
In this article, we hope to give you the ultimate guide on how to install the latest Linux Mint version on your PC. The installation and upgrade process is pretty straightforward irrespective of whether you are a beginner or an expert. You should know that the steps are very similar to that of the previous versions.
Requirements
Create Bootable USB or DVD Drive
Creating a boot device can be done with either a DVD or a USB with adequate capacity (recommended 4GB or more). USB drives are the preferred mostly due to their convenience and availability. Also, you can stick to burning Linux mint ISO files to DVD if you are a beginner.
Creating a Bootable DVD does not require additional software as you may directly burn the ISO to the Drive. However, USB booting requires other software, and you can choose the best one from top 5bootable USB tools for Windowsoperating system.
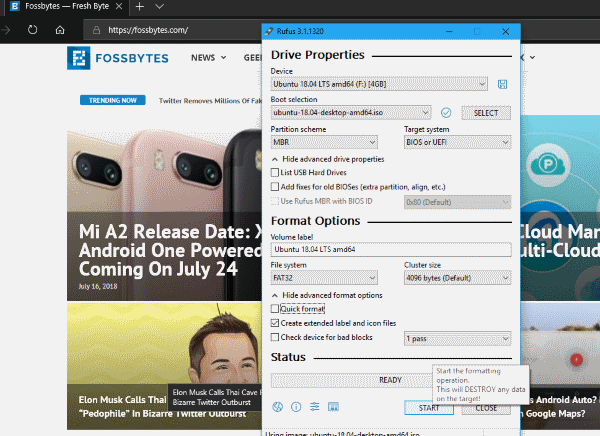
For Windows users, check out how to create abootable USB media using Rufusor how to createbootable USB without any software.
For users with Ubuntu, know all about the 3 easy ways to createbootable USB media from ISO in Ubuntu.

Use these articles to know how to install Linux from USB.
Boot from DVD or USB
Booting from specific drives can be a little tricky. If default does not set booting from USB/DVD, you will have to enable it by going to the bios and changing the boot order. The process of booting into the BIOS varies according to the variety of the OEM.
Otherwise, if you happen to be using Windows 10 operating system, you can boot into advanced startup options. ensure the USB drive is plugged in and then you can choose to boot into the media directly. You can know how to do this by going to our article how to enterBIOS Utility (UEFI Settings)on all PCs and boot from USB?

(Note: Make sure that you disableSecure Bootor enableLegacy modewhen looking to install Linux Distributions.)
Try Linux Mint 19 Tara without Installing
The best thing aboutLinux distrosis the well appreciated and tried out feature. Before installing the distribution on your machine, you’re able to alwaystry out the whole Linux experience. So, if you are very eager to try it out, you can do this by selectingtry Linux Mint 19 without installingwhen the USB media is booted up. That is usually the first option when it boots up.
Then, you can go through to Linux Mint Tara to get a brief idea on what exactly will you be working with. Also,you can start the installation while trying outLinux Mint. Hence, enabling you to work or browse for help while installing Linux Mint 19 Tara.

If you want to install it right away instead of trying it out, ChooseInstall Linux Mint 19. Otherwise, if you choose to install it after trying it out, you can double-click the Install Linux Mint icon (appears on the desktop and start menu). The steps for Installing is same for both.
Install Linux Mint 19 Tara
Now, the first screen that appears is the welcome screen allowing you tochoose thelanguagefor the installation. Next is thekeyboard layoutselection which will be pretty much straightforward.
The next screen prompts you to choose whether toinstall third-party software for graphics, Wi-Fi, Flash, Mp3 and other media. (Note: Notice another option below. This means Secure Boot isenabled. Grub Loader installation fails without disabling Secure Boot.)
For people in doubt, this option allows the users to skip the installation of additional proprietary software or drivers along with the central installation. You should tick the option to avoid spending time doing all of those at a later time. But skip this step now if you want to save time.
Finally, we will reach the more crucial part of the installation. The following screen will bring you to select the installation type where you have to be very careful as changes made here are irreversible. If you want to wipe all the hard drive data and install Linux Mint only, choose the first option:Erase disk and install Linux Mint. Other options are self-explanatory.
For most cases, we would recommend choosingSomething else.This installation type for Linux Mint 19 Tara provides users with more control of the installation. Especially, if you are looking for something like adual boot setup with Windows 10, this is the way to go. Most people prefer having both Operating systems so that you can have the best of both worlds.
When you need to Dual boot Windows operating system along with the Linux, you may set it up as given below.
Dual Boot Windows 10 and Linux Mint
There are tons of ways that you could set Linux Mint partitions. But for now, we’ll try to stick to the basics. You need to set up two crucial parameters. Namely,Root mount point( /)andSwap.Additionally, if you plan on storing more files, verify to add ahome(/home) partition as well.
TheRootpartition is where all your programs and software that you install will be stored. So the size of the Root partition is completely dependant on your usage. We are giving the recommended for reference. For Root partition, use the following settings:
ForSwappartition :
TheHomepartition is a lot like your documents and content partition. The main objective here is to have allyour media files and documentsin a separate partition other than the operating system files. Moreover, this can protect your files in case of an upgrade going wrong or corrupt system files. Its recommended settings are mentioned below:
After completion of the above steps, give a quick look to verify all the settings. Finally, ensure that thebootloader locationis set to install to the main hard drive. Again, the changes made are irreversible so make sure everything is the way it should be and clickContinue.
Finishing Touches
Moving forward, all the remaining steps are pretty undemanding. Select yourtimezonefrom the map or search for it in the text box and clickContinue.
Now, Enter yourmachinename,Username, andPassword. Note that this will be the administrator password. Additionally, you can choose whether to log in automatically without entering the password and encrypt the home folder.
After you clickContinue, the setup will now start installing the Linux mint OS and make the appropriate settings.
Start using Linux Mint 19 Tara
So that’s all that you need to do. After Installation is complete, you should make sure toremove the USBwhen that particular screen saying so pops up. Otherwise, the system will once again boot into that USB.
Finally, you’re able to see the Grub Bootloader asking you to choose which OS to boot along with another compatibility options. That’s it! You are now free to explore the wonderful world of Linux.
There are things that you need to do after booting up Linux Mint Tara for the first time. Want to know more? Let us know on the comment section below along with any queries regarding the Installation Process. Ciao!
